WORK IN PROGRESS!
Welcome to the Art course! Here is an overview of all of our classes.
THIS COURSE HAS 4 PARTS-
Part 1: Basics
Part 2: Paintings
Part 3: Still Life
Part 4: Portraits
Welcome to the Art course! Here is an overview of all of our classes.
THIS COURSE HAS 4 PARTS-
Part 1: Basics
Part 2: Paintings
Part 3: Still Life
Part 4: Portraits
|
Class 1: Color Theory
Class 2: Shading Techniques
Class 3: Shading with Color Pencils
|

|
Colour Theory...
|
|
|
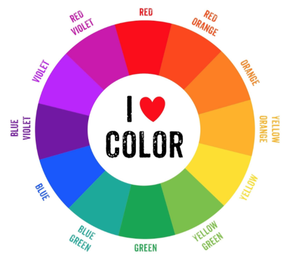
There are 3 main colors called primary colors. They are red, yellow, and blue and are called primary colors because you cannot mix colors to get these colors. When you mix 2 of these colors at a time, you get 3 secondary colors. Red and blue make purple, red and yellow make orange, yellow and blue make green. If you mix all 3 primary colors together you get brown. Finally, if you mix a primary color with a secondary color, you get a tertiary color.
MATERIALS REQUIRED-
MATERIALS REQUIRED-
- Red, blue and yellow paint
- Pallette
- Brushes
- A pencil
- Water
Worksheet on Color Theory

Shading Techniques
|
|

|
|
These 12 colors are the “main colors” but if you mix any of them with white or black, you’d get a tint or shade respectively. The depth of your tint or shade depends on how much white or black you add, making the color lighter or darker.
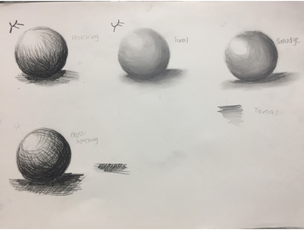
There are 4 main shading techniques: scumbling, shading, smudging, and hatching. Step 1: The easiest is hatching, which is drawing short, straight lines. The thicker and closer the lines are, the darker an area becomes and the opposite makes an area lighter. Another version similar to this is cross-hatching, which is when you draw another set of lines on top, making crosses. Step 2: Next is smudging, which is where you put a slightly thick layer of charcoal or graphite (depending on how dark the area is) and rub with your finger or cotton bud to blend it out and create a gradient. Step 3: Third is shading. Holding your pencil at an angle, press down with some pressure and color in the shadow areas. As you’re moving to the lighter areas, decrease the pressure. Step 4: Finally, scumbling. By drawing continuous little circles, close together or spread apart, you can shade any object. This technique is good for filling small, circular areas. |
MATERIALS REQUIRED-
|
Shading with Color Pencils
|
|
|
|
These 12 colors are the “main colors” but if you mix any of them with white or black, you’d get a tint or shade respectively. The depth of your tint or shade depends on how much white or black you add, making the color lighter or darker.
There are 4 main shading techniques: scumbling, shading, smudging, and hatching. Step 1: The easiest is hatching, which is drawing short, straight lines. The thicker and closer the lines are, the darker an area becomes and the opposite makes an area lighter. Another version similar to this is cross-hatching, which is when you draw another set of lines on top, making crosses. Step 2: Next is smudging, which is where you put a slightly thick layer of charcoal or graphite (depending on how dark the area is) and rub with your finger or cotton bud to blend it out and create a gradient. Step 3: Third is shading. Holding your pencil at an angle, press down with some pressure and color in the shadow areas. As you’re moving to the lighter areas, decrease the pressure. Step 4: Finally, scumbling. By drawing continuous little circles, close together or spread apart, you can shade any object. This technique is good for filling small, circular areas. |
MATERIALS REQUIRED-
|
|
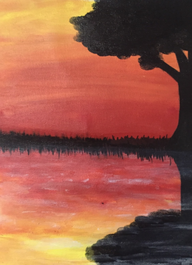
Class 1: Sunset Painting Class
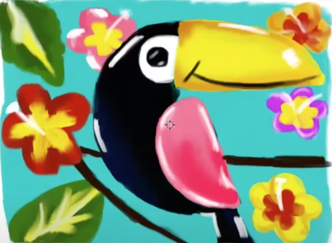
Class 2: Toucan Painting Class
Class 3: Sky Painting Class
|


|
|
Step 1: put the colors on the canvas in the order you want the gradient to go. If you’re using multiple colors put those colors in order along with some white. If you’re using 1 color, put spots of paint all over the canvas and add more white in the lighter areas and less to none in the darker areas.
Step 2: take a big brush (or your finger) and some water and start using big strokes to blend your paint together. Using water makes this step easier. Step 3: add details. If you’re trying to paint water, take white and some water and paint little squiggles. Blend these out into the background with some water. For clouds, take a sponge with some watery paint and dab it onto the background before it dries. |
MATERIALS REQUIRED
|
|
|
|
|
Step 1: put the colors on the canvas in the order you want the gradient to go. If you’re using multiple colors put those colors in order along with some white. If you’re using 1 color, put spots of paint all over the canvas and add more white in the lighter areas and less to none in the darker areas.
Step 2: take a big brush (or your finger) and some water and start using big strokes to blend your paint together. Using water makes this step easier. Step 3: add details. If you’re trying to paint water, take white and some water and paint little squiggles. Blend these out into the background with some water. For clouds, take a sponge with some watery paint and dab it onto the background before it dries. |
MATERIALS REQUIRED
|
|
|
|
Step 1: put the colors on the canvas in the order you want the gradient to go. If you’re using multiple colors put those colors in order along with some white. If you’re using 1 color, put spots of paint all over the canvas and add more white in the lighter areas and less to none in the darker areas.
Step 2: take a big brush (or your finger) and some water and start using big strokes to blend your paint together. Using water makes this step easier. Step 3: add details. If you’re trying to paint water, take white and some water and paint little squiggles. Blend these out into the background with some water. For clouds, take a sponge with some watery paint and dab it onto the background before it dries. |
MATERIALS REQUIRED
|
|
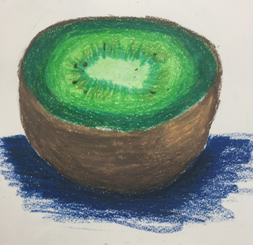
Class 1: Kiwi with Crayons
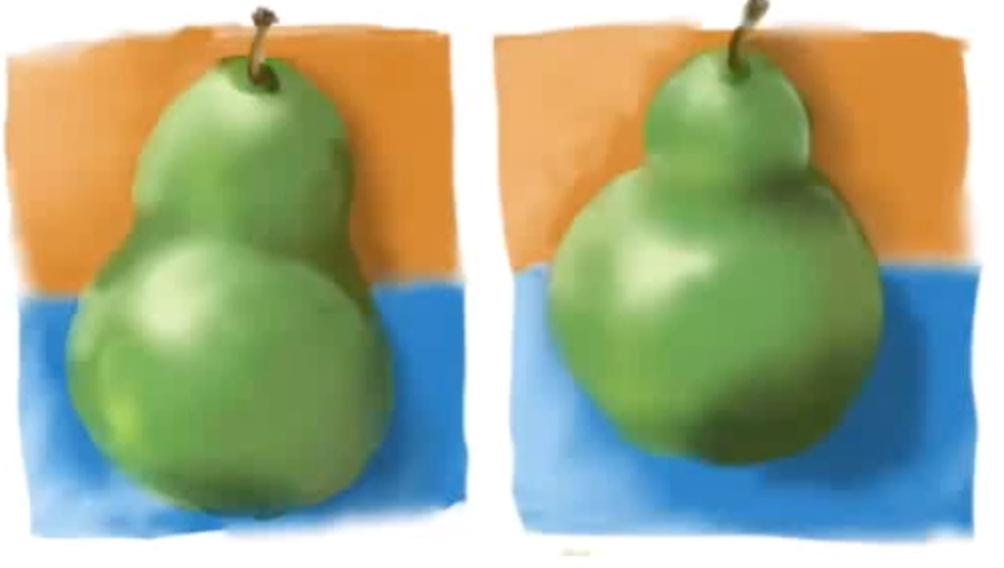
Class 2: Pear Painting Class
|
|
|
|

|
|
Step 1: based on the fruit you are drawing draw smaller circles. For smaller fruits, use one circle. Define this circle with short lines. For bigger fruits, draw multiple circles on top of each other. Connect them with curves.
Step 2: start painting, keeping in mind the highlight spot and shadows. Keep a little circle near the light source white, acting as the highlight. From here, start making the colors darker. The area opposite the light source should be the darkest area. Step 3: add details like seeds, skins, etc. make sure they follow the light source and have highlights and shadows. |
MATERIALS REQUIRED
|
|
|
|
|
Step 1: based on the fruit you are drawing draw smaller circles. For smaller fruits, use one circle. Define this circle with short lines. For bigger fruits, draw multiple circles on top of each other. Connect them with curves.
Step 2: start painting, keeping in mind the highlight spot and shadows. Keep a little circle near the light source white, acting as the highlight. From here, start making the colors darker. The area opposite the light source should be the darkest area. Step 3: add details like seeds, skins, etc. make sure they follow the light source and have highlights and shadows. |
MATERIALS REQUIRED
|
|
Class 1: Picasso Painting Class
Class 2: Eye Drawing Class
Class 3: Mouth and Nose Drawing
|
|
|
|
|
|
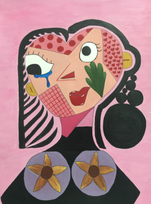
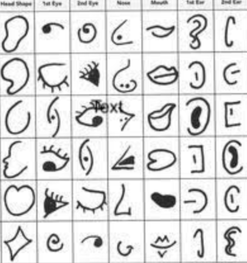
Pablo Picasso was known for his cubism work, which we explored in this class. By picking random shapes from objects around you, you can put together a self-portrait. There are no rules saying where the facial features have to go, so you can go crazy! You can also draw different patterns on the face based on what you’re thinking about or your personality. To color in the face, use your favorite colors. For this activity, there are literally no rules, so you can go wild and still make very artistic pieces.
|
MATERIALS REQUIRED
|
|
|

|
|
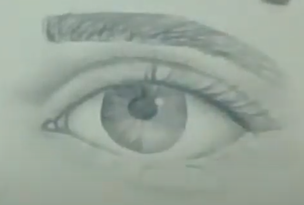
HOW TO DRAW AN EYE -
|
MATERIALS REQUIRED
|
|
HOW TO DRAW A MOUTH -
|
MATERIALS REQUIRED
|
